DIY Luluv & Etrog Toy for Sukkot
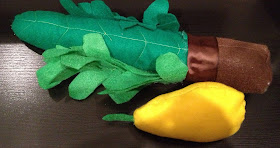
I saw this cute Lulav and Etrog toy many times and decided that I wanted to make my own for Baby Bear.
{I know it is so close to Sukkot to post this, but you still have all of the weekdays to make this!}
This is what a real Lulav and Etrog look like
Go here
Materials
Eco-Fi Felt sheets~
1 brown or cream, 2 light green, 2 medium green, 2 dark green,1 yellow
Cotton Stuffing (or fabric scraps)
Fabric Glue
Ribbon (optional)
The materials cost me $2 since I only needed to buy the felt and it took me less then 1 hour to do!
Fold your yellow fabric in half. Use something round to get your etrog shape and trace with a marker and cut out your pieces. If you want to make a green tip, cut a small piece out and insert it so that you will sew it into your etrog. I forgot to do this, so I had to hand stitch it later.
Sew your etrog leaving a hole to turn it inside-out.
Stuff and hand stitch the bottom
Here is a view with my tip before I stitched the bottom shut.
Now you want to to make the middle Date Palm Frond. Fold your dark green in half and cut out a long shape like above.
To give it some detail I used a lighter color thread and made some stitches down the center and V's going down. First I marked the lines with a chalk marker.
Then I stitched the lines on my sewing machine on both pieces. Turn the right sides together and sew leaving the entire flat bottom open.
Flip it and stuff
The bottom was a little more complicated. It has to look like a cup when finished. I used a bottle to get the shape that was the same size as my Palm branch opening. First I made a strip that fit around the bottle. Then I traced the bottom of the bottle leaving a 1/2" sewing allowance.
First sew the flat piece and DO NOT turn inside out.
Pin the circle around the bottom edge and sew carefully. Then you will flip it inside and stuff. You will save this piece until you finish your other 2 leaves.
Now you are going to do the willow. The willow has the long leaves. Fold your medium green in half and draw your leaves. You will ten sew them together with one stitch down the center. Your willow should be shorter then the palm.
To give it more depth, I cut out more leaves and folded my willow and sewed some leaves where there was no seam before.
Your Myrtle branch has small leaves. It will be the same height as the willow. I cut a bunch of leaves out of the light green and overlapped them on a long piece of the same color and sewed a stitch down the middle.
I hand stitched the Willow and Myrtle to the middle Palm in 3 places so it was secure. Then I glued the bottom holder to the palm bottom.
I used a brown ribbon to cover the glue line. You could also use another piece of felt.
Now you are ready to shake it!!
updated 10/4:
Here is a great variation that Bayla L-B made!
The tradition in her family (and my husbands) is to hand tie the branches together using some of the palm.
*Thanks for sharing Bayla!*


